Wednesday, January 25, 2012

Chocolate and Bacon Truffles


Chocolate and Bacon Truffles


1/2 lb. Smoked Bacon (I like applewood, but any smoked flavor will do)
1/2 cup Brandy
1 1/2 cup Heavy Whipping Cream
1 1/2 lbs. Semisweet Chocolate (4 cups, chopped)
3 cups Dark Chocolate, chopped  (I use Ghirardelli Chocolate)
Reserve Bacon Fat
1/4 cup Turbinado Sugar

1/2 lb. smoked bacon - cut into 1/2" pieces
Cook bacon until crisp.  Strain off fat and set aside for use in coating.  Return bacon bits, (saving out 1/4 cup for the brickle topping!) to the pan and deg laze over low heat with 1/2 cup of brandy, be careful!!!
When most of the liquid has evaporated, add 1 1/2 cups heavy whipping cream.  Heat cream over med-low heat until it boils, stirring up the brown bits off the bottom of the pan with a wooden spoon.
Turn off the heat and let sit for 20 mins.
Before straining, turn heat back on and bring just to a slight simmer.

Strain this mixture into a large stainless bowl. Whisk in 1 1/2 lbs. (4 cups) of chopped semisweet chocolate.
Whisk until well combined. Cover and chill overnight.

Roll chilled chocolate into bite-size balls.  Lay out on parchment covered sheet pan and freeze while you are melting the coating.

Coating:  melt in a double boiler 3 cups chopped dark chocolate and 1/2 cup of the bacon fat over simmering water until smooth.

For Brickle topping:  heat together reserved bacon bits with 1/4 cup turbinado sugar and 2 tbs. water in a small heavy bottom saucepan.  Boil gently until mixture is caramel colored and thick.  Pour onto a sheet pan lined with parchment paper and spread out to cool.  When completely cool, cover with a piece of parchment and break up brickle until its in very small pieces, almost powder looking.

Assembly:  Drop chilled truffles one at a time into the chocolate coating mixture... remove with large fork, tapping the sides of the bowl to remove excess chocolate as possible.  Immediately decorate your truffle with the bacon brickle. Chill flat on parchment and move to a decorative paper cups once they harden.

Best enjoyed at room temp but keep refrigerated  otherwise.


Keep Inspiring!

Tuesday, January 24, 2012

Chicken Satay with Spicy Peanut Sauce

Chicken Satay with Spicy Peanut Sauce


These Indonesian-style skewers or may be in tasting spoon as shown here, are a great way to start a barbecue, and they're equally good cooked and eaten indoors - either at the table, or as a pre-dinner nibble.


  • 3 skinless boneless chicken breasts
  • 1 garlic clove, crushed
  • 1 tsp. grated fresh ginger
  • Grated zest and juice of 1 lime
  • 1 tsp. Thai fish sauce
For the peanut sauce
  • 2 tbsp. coconut milk
  • 4 tbsp. crunch peanut butter
  • Juice of 1/2 lime
  • 1/4 tsp.dried chili flakes (optional)
  • Black sesame seed for garnish
Slice each chicken breast into 4 long strips.  Combine the garlic, ginger, lime zest and juice, and fish sauce, and pour over the chicken.  Cover and marinate for about 1 hour.  Meanwhile, soak 12 bamboo skewers in cold water.

Preheat the broiler.  Thread a strip of chicken onto each skewer. Cook the chicken for about 3 minutes on each side, until cooked through.

Meanwhile, stir the coconut milk into the peanut butter until smooth and creamy.  Stir in the lime juice and chili. Serve immediately with the chicken satay.

For tasting spoons:  Remove chicken from skewer. Cut each slice of chicken into2 or 3 bite-size pieces (depends on the size of your chicken strip). 

Presentation on tasting spoons:  Place a little of the peanut sauce in the spoon. Place a chicken piece in the spoon. Sprinkle with black sesame seeds and a green garnish if desired.

makes 12 skewers or 24-36 tasting spoons


Keep Inspiring!


Monday, January 23, 2012

Roasted Red Bell Pepper and Walnut Dip

Roasted Red Bell Pepper and Walnut Dip


Richly flavored with walnuts and smoky bell peppers, and served with chilled white wine, this is the perfect dip for those summer barbecues.


  • 2 large red bell peppers
  • 1/3 cup walnuts
  • 1/2 tsp paprika
  • 1/4 tsp. ground ginger
  • Good pinch of cayenne pepper
  • 1 garlic clove, crushed
  • 2 tbsp. olive oil
  • Salt
  • 2 tsp. lemon juice
  • 2 tsp. chopped fresh mint
Preheat the oven to 450.  Place the peppers on a baking sheet and roast them for about 30 minutes, until blackened.  Put the peppers in a bowl, cover with plastic wrap, and let stand for about 20 minutes, until they are cool enough to handle and the skins have loosened.

Peel and seed the peppers, then put the flesh in a food processor with the walnuts, paprika, ginger, cayenne pepper, garlic, and oil.  Season with salt and process to a smooth puree.

Transfer the dip to a bowl, stir in lemon juice to taste, and adjust the seasoning,  Leave to cool, then stir in the mint and serve at room temperature.

Serves 4


Keep Inspiring!

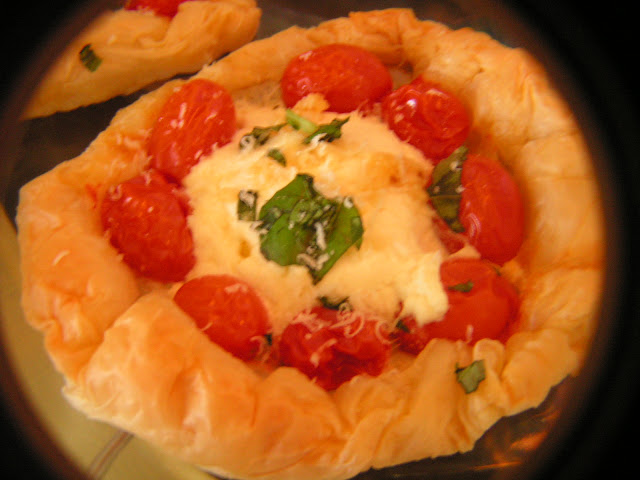
Phyllo Tartlets with Cherry Tomatoes, Basil and Ricotta

Phyllo Tartlets with Cherry Tomatoes, Basil and Ricotta


These crisp, golden tartlets filled with baked ricotta and garlic-flavored tomatoes make an elegant start to a special meal.


  • 8 sheets phyllo pastry
  • 3 tbsp. butter, melted
  • 28 cherry tomatoes
  • 1/2 cup ricotta cheese
  • 2 tbsp. olive oil
  • 2 garlic cloves, crushed
  • Handful of fresh basil leaves
  • Salt and ground black pepper
Preheat the oven to 350.  Grease a baking sheet.

Lay one sheet of phyllo pastry on a board and brush with melted butter.  Lay a second sheet on top and brush with more butter.  Place one-quarter of the tomatoes in the center of the phyllo.  Add dollops of ricotta, nestled around and among the tomatoes.  Gather the phyllo around the filling and twist the edges together to make an open tart with a firm collar around the edge.  Combine the oil and garlic and drizzle this over the tomatoes and ricotta.  Season with salt and pepper.

Repeat with the remaining pastry sheets and filling.  Bake the tartlets on the baking sheet for 15 minutes, until crisp and golden.  Serve immediately, sprinkle with fresh basil leaves.

Serves 4


Keep Inspiring!

Walnut toasts with Warm Goat Cheese and Fig

Walnut toasts with Warm Goats Cheese and Fig


Tart, piquant goats cheese and sweet juicy fig are a natural partnership for a simple, elegant canape on rich walnut toast.  Any other good bread can be used instead of walnut bread if desired.


  • 4 slices walnut bread
  • 4 oz. goats cheese
  • 2 tbsp. toasted pine nuts
  • 2 figs, each cut into 6 wedges
Preheat the broiler.  Cut each slice of bread into three bite-size pieces and toast on one side.


Meanwhile, slice the goats cheese and into 12 bite-size pieces.  Turn the toasts, uncooked side up.  Top each toast with a piece of cheese and broil for about 2 minutes, until golden and bubbling.

Sprinkle the pine nuts over the toasts, top with a wedge of fig, and serve immediately.

Makes 12


Keep Inspiring!

Prosciutto-wrapped Asparagus with Lemon Mayo

Prosciutto-wrapped Asparagus with Lemon Mayo


These sophisticated bites make an irresistible  nibble with aperitifs or as a more formal appetizer.  You can prepare everything ahead, then simply pop them in the oven when your guests arrive.


  • 1/2 cup mayonnaise
  • Grated zest of 1 lemon
  • 1 tbsp. fresh lemon juice
  • 1/2 tbsp. snipped fresh chives
  • 8 asparagus tips
  • 8 wafer-thin slices prosciutto, cut into strips
  • Olive oil, for drizzling
  • Ground black pepper
Preheat the oven to 375.  Combine the mayonnaise, lemon zest, juice, and chives in a serving dish.  Cover and place in the refrigerator.

Wrap each asparagus tip in a strip of prosciutto, arrange on a baking sheet, and drizzle with the oil.  Sprinkle with a little black pepper and roast for 6 to 7 minutes, until tender.

Transfer the prosciutto-wrapped asparagus to a platter and serve with the lemon mayo.

Serves 4


Keep Inspiring!


Bocconcini with Mint and Chili

Bocconcini with Mint and Chili


You can buy bocconcini, bite-size balls of mozzarella, in most good cheese shops, larger supermarkets, and delis.  Alternatively, buy a block of regular mozzarella and cut it into bite-size pieces.


  • 9 oz. bocconcini mozzarella
  • 1/4 tsp. dried chili flakes
  • 1 tsp. chopped fresh mint
  • 1 1/2 tbsp. extra virgin olive oil


Drain the bocconcini and place in a bowl.  Sprinkle with the chili and mint and drizzle with the oil.  Toss to coat each ball well.

Cover and leave to marinate in the refrigerator for a least 1 hour.  Allow the cheese to return to room temperature before serving.

Serves 4


Keep Inspiring!

Sunday, January 22, 2012

Caramelized Onion and Prosciutto Squares

Caramelized Onion and Prosciutto Squares


Based on the classic French pissaladiere, these melting squares of puff pastry make a chunky, satisfying appetizer to hand around with drinks.


  • 2 tbsp. olive oil
  • 1 large Spanish onion, halved and thinly sliced
  • Salt and black pepper
  • 1 tsp. fresh thyme leaves, plus extra for garnish
  • 2 tsp. brown sugar
  • 13 oz. package ready-rolled puff pastry
  • 4 slices of prosciutto, cut into pieces
Heat the oil in a pan.  Add the onion, season with salt and pepper, and sprinkle with thyme. Cook gently, stirring occasionally, for about 20 minutes, until the onion is soft and tender.
Sprinkle in the brown sugar and cook for a further 10 minutes, stirring more frequently, until the onion is golden and sticky.  Check the seasoning.

Meanwhile, preheat the oven to 375.  Unroll the pastry onto a large baking sheet.  Spread the onion on the pastry, then arrange the anchovies in a lattice pattern over the top.

Bake for about 25 minutes, until the pastry is crisp and golden.  Cut the pastry into 12 squares or rectangles and serve hot, warm, or at room temperature, sprinkled with more fresh thyme.

Makes 12


Bon Apetit!

Keep Inspiring

Old World Charm (part 2)

OLD WORLD CHARM (part 2)

Hello Everyone!

    As some of you are experiencing "winter" with the crisp, cold air and may even had some snow, we are going to continue to take a journey with me and take a break from the everyday life.

I hope you can capture the character from the old world charm and incorporate some of it in your decorating designing.  So, here we go! Off to Turkey and Rhodes


Kusadasi (pronounced kujadasw) is a resort town on Turkey's Aegean coast and the center of the seaside district of the same name in Aydin Province.  Kusadasi lies at a distance of 95 km (59 mi) to the south from the region's largest metropolitan center of Izmir, and 71 km (44 mi) from the provincial seat of Aydin situated inland.  Its primary idustry is tourism.


I remember walking around wearing a turquoise necklace and this Turkish man followed me all around the shopping complex holding this turquoise necklace wanting me to bargin and buy! As you can see, the sellers hang in the middle and then snatch you up as you are walking and lure you in their shops to buy their merchandise.


The streets in Kusadasi.  (We went to Epehsus and the House of Virgin Mary but I can't seem to locate those pictures. Sorry! However, two must places to visit if you ever get to go!)


 Leaving Turkey


Arriving to Rhodes


The castle wall surround the island


Entering a shopaholics paradise!!


A very welcoming friend...

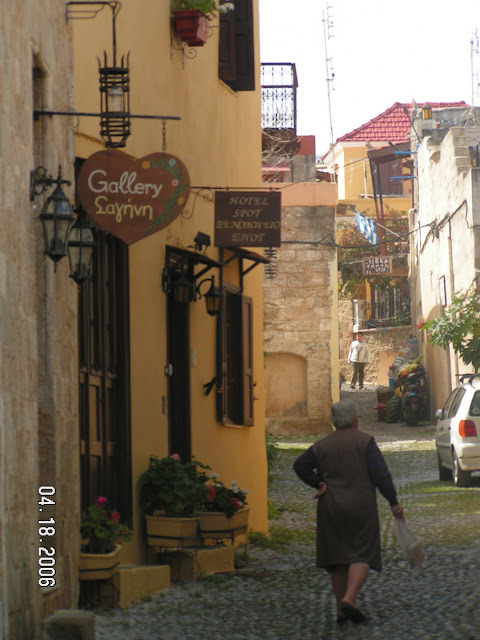
....as we stroll through the streets.

Household chores among the early hours of the day.....


..... while others demonstrate their talent.


A welcoming store mat....


.... and the relaxing side streets.


The usage of barrels....


.... and a quite spot.


The castle....


... the gardens

and a beautiful sunset to end the perfect day!

Our next destination....... Crete and Santorini!

I hope you will continue to follow me on this journey.
If you missed part 1 click HERE

Parties I will be linking up to:
Seasonal Sundays

Keep Inspiring